Lindenmayer systems
A Lindemayer system or LSystem for short consists of an alphabet of symbols that can be used to make strings, a collection of production that expand each symbol into some larger string of symbols, an initial “axiom” string from which to begin construction, and a mechanism for translating the generated strings into geometric structures.
A few years back, I built a rudimentary website to extrapolate a few known LSystems in pure JS. However, presently I have been getting more comfortable with Rust 🦀 and explored rebuilding it with Rust and wasm-bindgen to get better performance for tougher iterations.
Website - vsekar.me/LSystems/
Repository - github.com/Spockuto/LSystems/
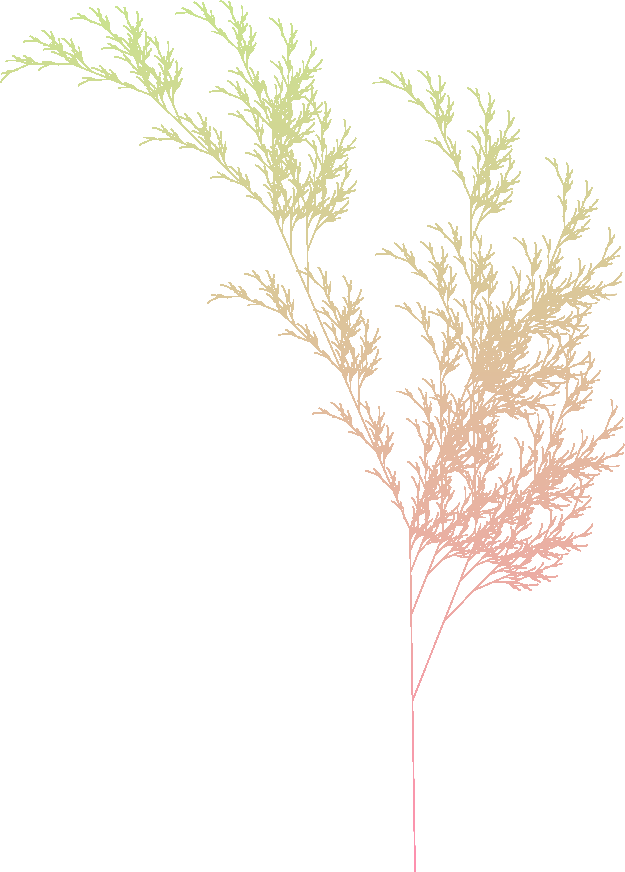
Now let’s explore how an axiom, a set of rules, and an angle can be developed into this beautiful fern
Step 0 - Define the LSystem
For Barnsley Fern, the LSystem is defined as follows
Axiom : X
Rules :
 - X -> F-[[X]+X]+F[+FX]-X
 - F -> FF
Angle : 22.5
This translates into the following for our Rust implementation.
#![allow(unused)]
fn main() {
lazy_static! {
    static ref BARNSLEY_FERN: LSystem = LSystem {
        variables: "XF",
        axiom: "X",
        rules: vec![
            ('X', "F-[[X]+X]+F[+FX]-X"),
            ('F', "FF"),
        ]
        .into_iter()
        .collect(),
        angle: 22.5,
        max_rounds: 8,
    };
}
}- variables : These are the identifiers that will be considered during building the sequence. Others will be skipped.
- axiom : The initial sequence
- rules : Expansion rules for each identifier
- angle : Explained later
- max_rounds - Implementation detail. Maximum number of supported iterations before running out of heap memory.
Step 1 - Generate the sequence
Once the LSystem is defined, we can build the drawing sequence. Iterations define the number of rounds the sequence will be expanded using the given rules. The higher the iteration, the better defined the picture is.
#![allow(unused)]
fn main() {
/// Generate the Turtle graphics sequence for given iterations
pub fn expand(&self, iterations: u32) -> String {

    // panic if given iterations are greater than the accepted limit.
    if iterations > self.0.max_rounds {
        panic!("Max limit reached");
    }

    let mut sequence = String::new();
    for i in 0..iterations {
        if i == 0 {
            // First iteration is the axiom
            sequence.insert_str(0, self.0.axiom);
        } else {
            let sequence_copy = sequence.to_string();
            let mut insert_index = 0;
            for identifier in sequence_copy.chars() {
                // Skip if the variable in sequence doesn't have a rule
                if !self.0.variables.contains(identifier) {
                    insert_index += 1;
                    continue;
                }
                // Expand the sequence based on the rule
                let rule = self.0.rules.get(&identifier).unwrap();
                sequence.remove(insert_index);
                sequence.insert_str(insert_index, rule);
                insert_index += &rule.len();
            }
        }
        // The current sequence will be used as the generator for the next round
    }
    sequence
}
}
Note: The function above can also be written recursively but for larger iterations, you would run out of stack depth way before running out of heap memory.
For Barnsley Fern, the sequence expands as follows for subsequent iterations
| Iterations | Sequence |
|---|---|
| 1 | X |
| 2 | F-[[X]+X]+F[+FX]-X |
| 3 | FF-[[F-[[X]+X]+F[+FX]-X]+F-[[X]+X]+F[+FX]-X]+FF[+FFF-[[X]+X]+F[+FX]-X]-F-[[X]+X]+F[+FX]-X |
| 4 | FFFF-[[FF-[[F-[[X]+X]+F[+FX]-X]+F-[[X]+X]+F[+FX]-X]+FF[+FFF-[[X]+X]+F[+FX]-X]-F-[[X]+X]+F[+FX]-X]+FF-[[F-[[X]+X]+F[+FX]-X]+F-[[X]+X]+F[+FX]-X]+FF[+FFF-[[X]+X]+F[+FX]-X]-F-[[X]+X]+F[+FX]-X]+FFFF[+FFFFFF-[[F-[[X]+X]+F[+FX]-X]+F-[[X]+X]+F[+FX]-X]+FF[+FFF-[[X]+X]+F[+FX]-X]-F-[[X]+X]+F[+FX]-X]-FF-[[F-[[X]+X]+F[+FX]-X]+F-[[X]+X]+F[+FX]-X]+FF[+FFF-[[X]+X]+F[+FX]-X]-F-[[X]+X]+F[+FX]-X |
Step 2 - Draw the canvas based on the sequence
Now that the sequence is generated, we can start building the canvas. Each character in the sequence defines a particular set of operations on the canvas. This allows us to convert the sequence into a picture.
#![allow(unused)]
fn main() {
// Define length
// Set the angle to the LSystem angle
let angle_rad = -1.0 * PI * angle / 180.0;
let (mut x, mut y) = (0.0, 0.0);
let mut stack = vec![];

for seq in sequence.chars() {
    // perform operations on the canvas
    match seq {
        // draw a line to (x,y) at given length and angle
        'F' | 'A' | 'B' => {
            x += length * angle.cos();
            y += length * angle.sin();
            context.line_to(x, y);
            context.stroke();
        }
        'S' => {
        // move along a line to (x,y) at given length and angle
            x += length * angle.cos();
            y += length * angle.sin();
            context.move_to(x, y);
        }
        '+' => {
        // rotate counterclockwise by angle_rad
            angle += angle_rad;
        }
        '-' => {
        // rotate clockwise by angle rad
            angle -= angle_rad;
        }
        '[' => {
        // push a point into stack
            stack.push(Line { x, y, angle });
        }
        ']' => {
        // Pop a point from the stack and move to it.
            let line = stack.pop().unwrap();
            (x, y, angle) = (line.x, line.y, line.angle);
            context.move_to(x, y);
        }
        // For others, skip and continue
        _ => continue,
    }
}
}| Iterations | Barnsley Fern |
|---|---|
| 1 | None |
| 2 |  |
| 3 |  |
| 4 |  |
| 5 |  |
| … | … |
| 8 |  |
Step 3 - Color the canvas using a linear gradient
The final step in generating our fractal is applying a linear gradient between two colors over our canvas. This can be achieved by applying color interpolation over each dark pixel.
#![allow(unused)]
fn main() {
let image_data = context
.get_image_data(0.0, 0.0, width as f64, height as f64)
.unwrap();
// data contains 4 u8 values per pixel indicating RGBA (red, green, blue, alpha) values
let mut data = image_data.data();
// Set the linear gradient colors : color1 -> color2
let c1 = Rgb::from_hex_str(&color1).unwrap();
let c2 = Rgb::from_hex_str(&color2).unwrap();
// linear gradient is defined using interpolation
// Assume the fraction grows from 0 to 1
// pixel.r = c1.r + (c2.r - c1.r) * fraction
// pixel.g = c1.g + (c2.g - c1.g) * fraction
// pixel.b = c1.b + (c2.b - c1.b) * fraction
for index in 0..(width * height * 4) as usize {
// Since the canvas is drawn with black, only alpha will be set initially
if data[index] > 0 {
// pixel's alpha is set
// Update the color using interpolation
let fraction = index as f32 / (height * width * 4) as f32;
data[index - 3] = (c1.get_red() + (c2.get_red() - c1.get_red()) * fraction) as u8;
data[index - 2] = (c1.get_green() + (c2.get_green() - c1.get_green()) * fraction) as u8;
data[index - 1] = (c1.get_blue() + (c2.get_blue() - c1.get_blue()) * fraction) as u8;
}
}
let slice_data = Clamped(&data.0[..]);
let image_data = web_sys::ImageData::new_with_u8_clamped_array_and_sh(
slice_data,
width as u32,
height as u32,
)
.unwrap();
// load the data back into the canvas
context.put_image_data(&image_data, 0.0, 0.0).unwrap();
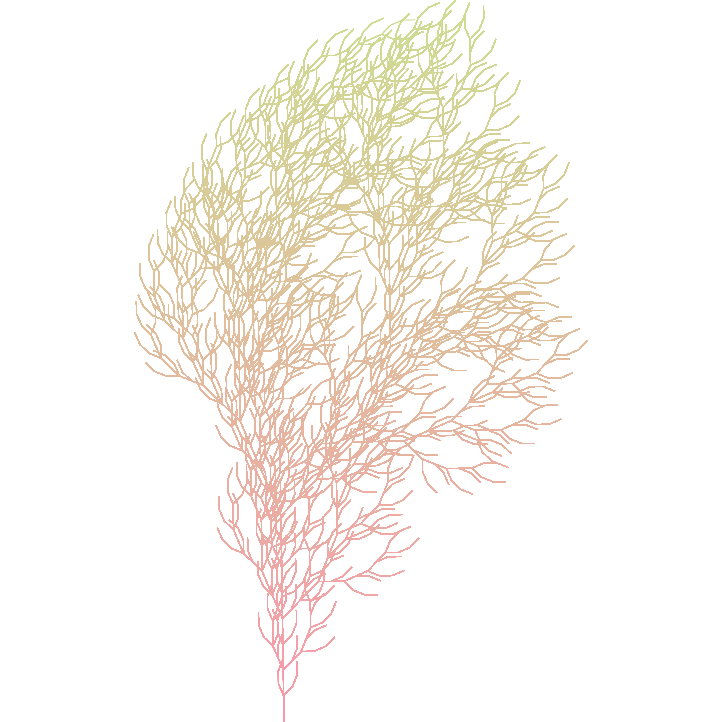
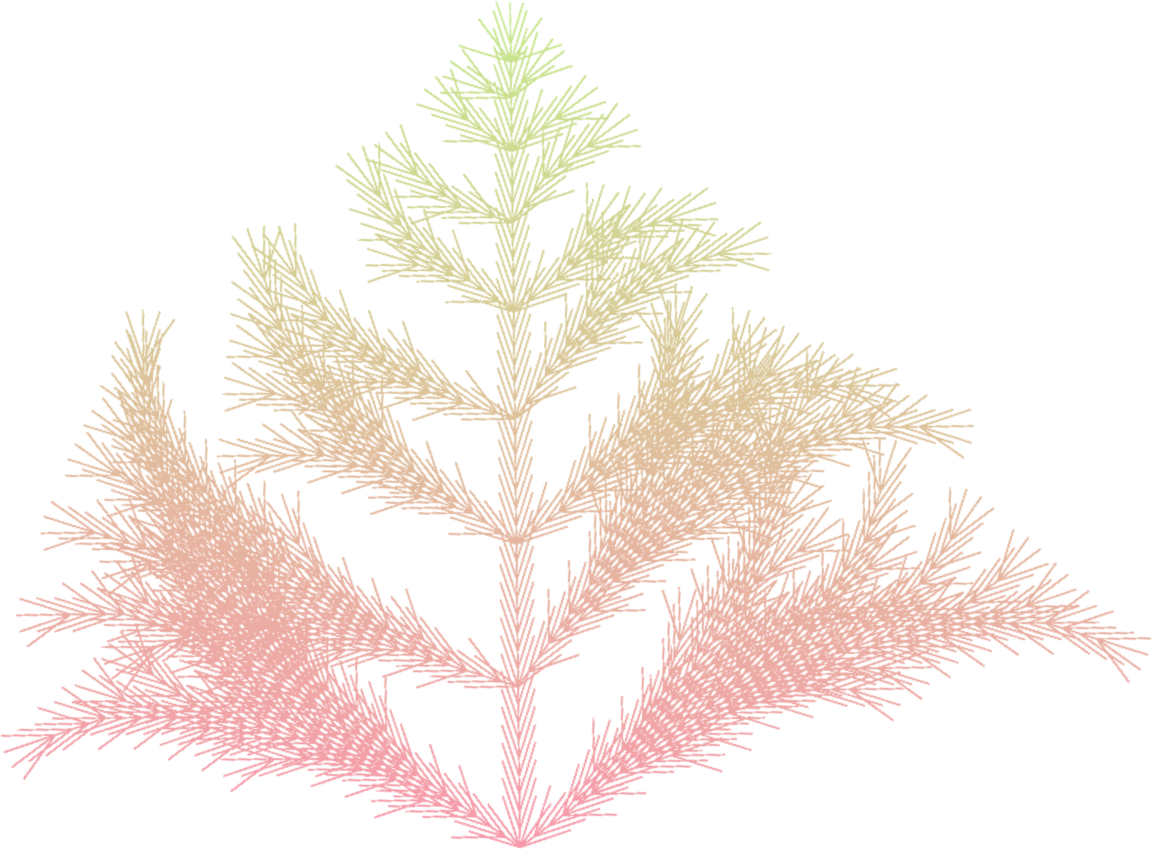
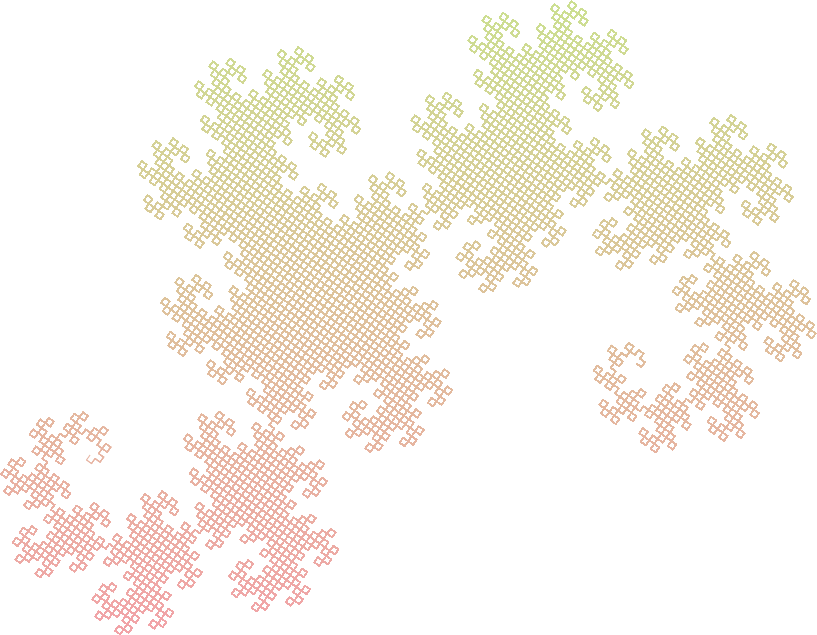
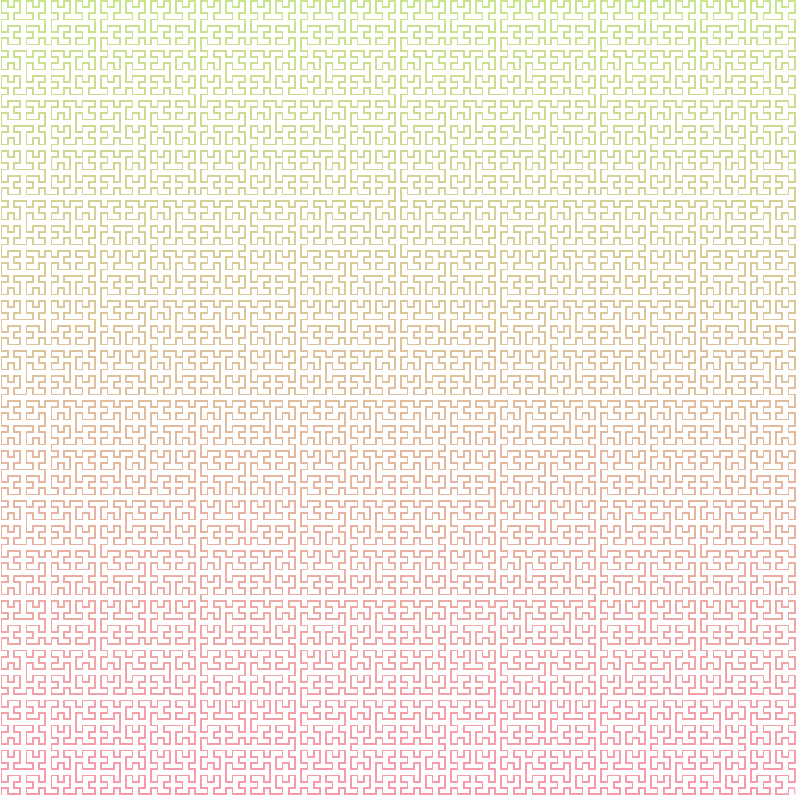
}With this, a linear gradient between #C6EA8D and #FE90AF gives us
Note: Colors don’t exactly behave well with linear interpolation. For more details check out The Secrets of Colour Interpolation
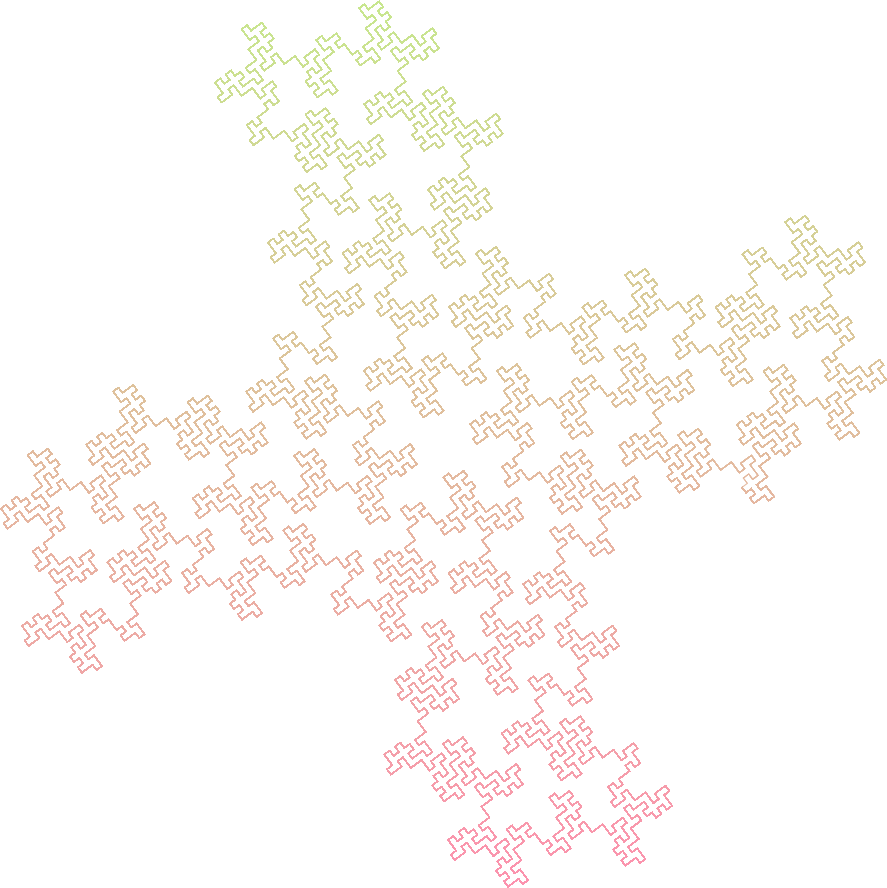
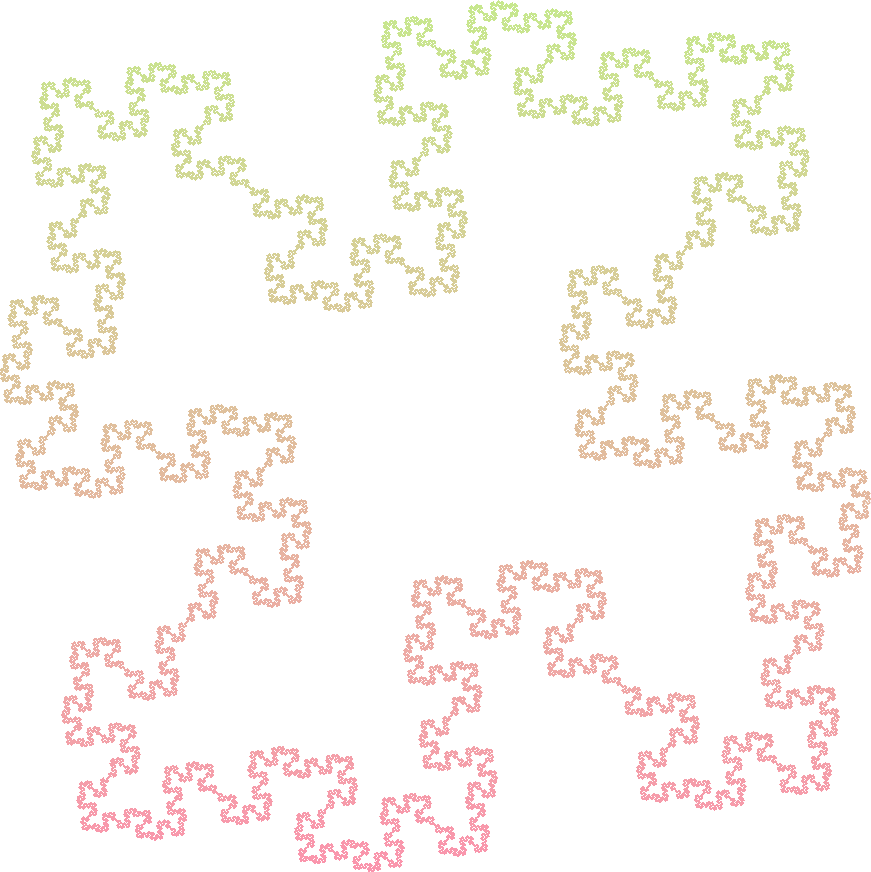
Fractal Tree
Axiom : F
Rules :
 - F -> FF-[-F+F+F]+[+F-F-F]
Angle : 22.5
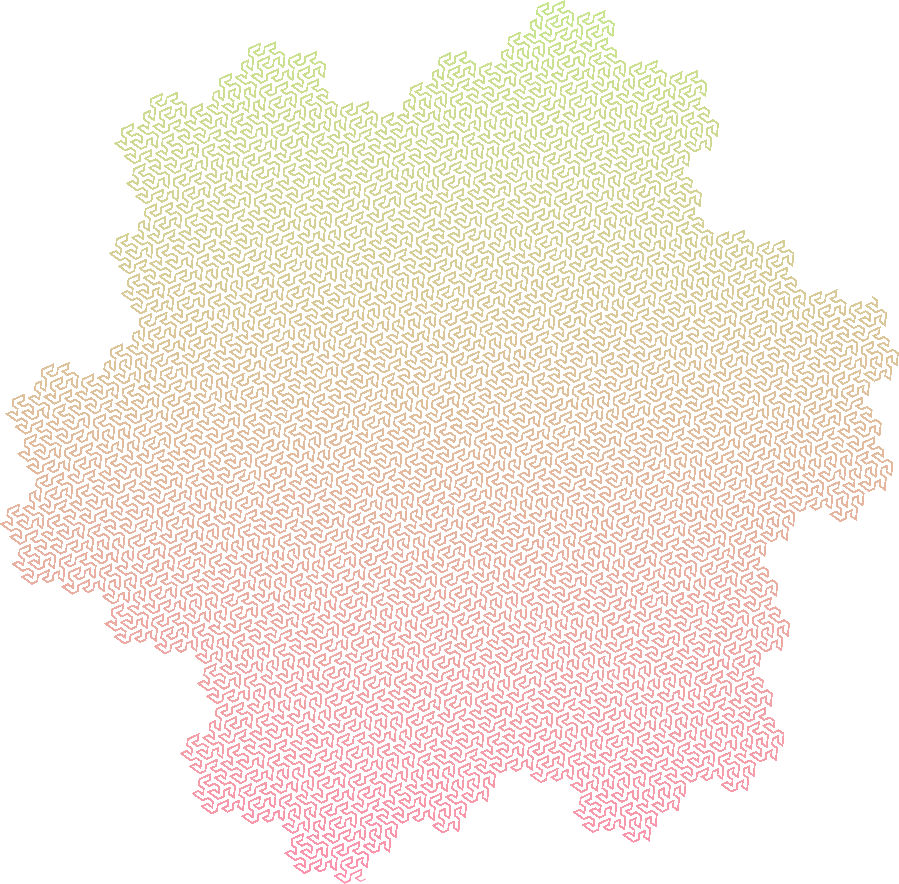
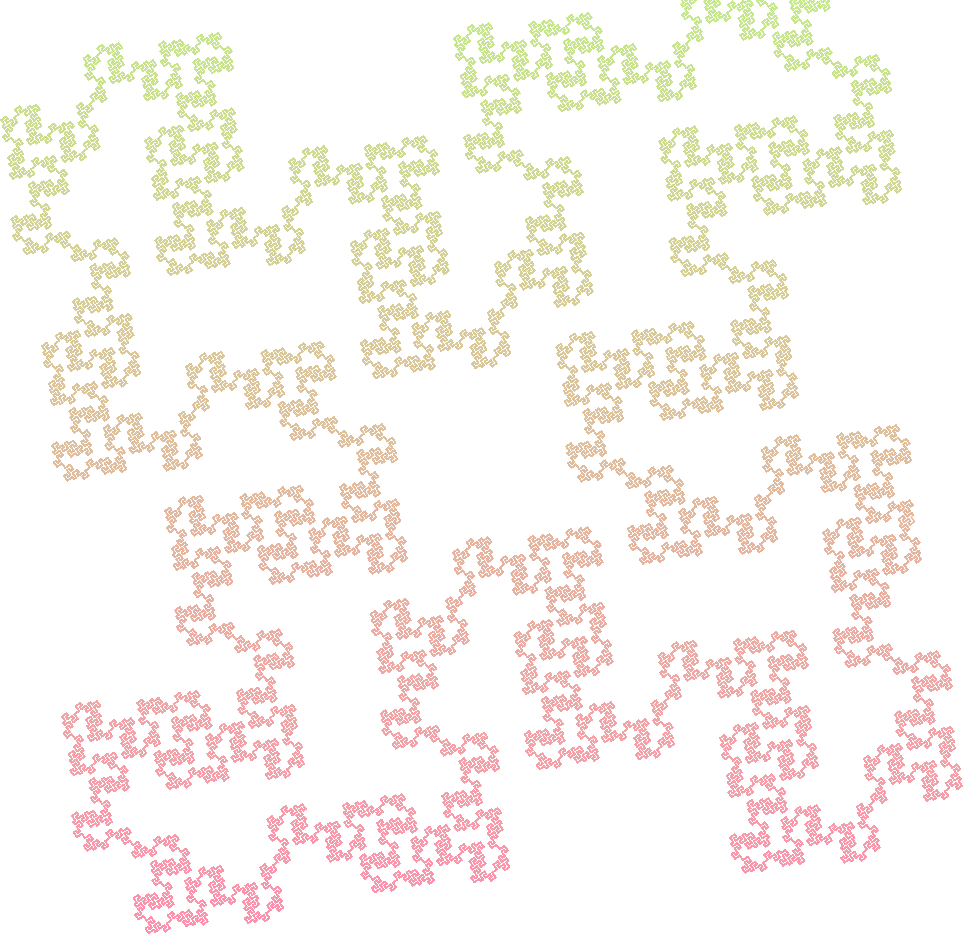
Fractal Tree 2
Axiom : VZFFF
Rules :
 - F -> F
 - V -> [+++W][---W]YV
 - W -> +X[-W]Z
 - X -> -W[+X]Z
 - Y -> YZ
 - Z -> [-FFF][+FFF]F
Angle : 18
Dragon Curve
Axiom : FX
Rules :
 - X -> X+YF+
 - Y -> -FX-Y
Angle : 90
32 Segment Curve
Axiom : F+F+F+F
Rules :
 - F -> -F+F-F-F+F+FF-F+F+FF+F-F-FF+FF-FF+F+F-FF-F-F+FF-F-F+F+F-F+
Angle : 90
Peano Gosper Curve
Axiom : A
Rules :
 - A -> A-B--B+A++AA+B-
 - B -> +A-BB--B-A++A+B
Angle : 60
Koch Snowflake
Axiom : F++F++F
Rules :
 - F -> F-F++F-F
Angle : 60

Koch Snowflake 2
Axiom : F+F+F+F
Rules :
 - F -> F-F+F+F-F
Angle : 60
Koch Snowflake 3
Axiom : F
Rules :
 - F -> F-F+F+F-F
Angle : 85
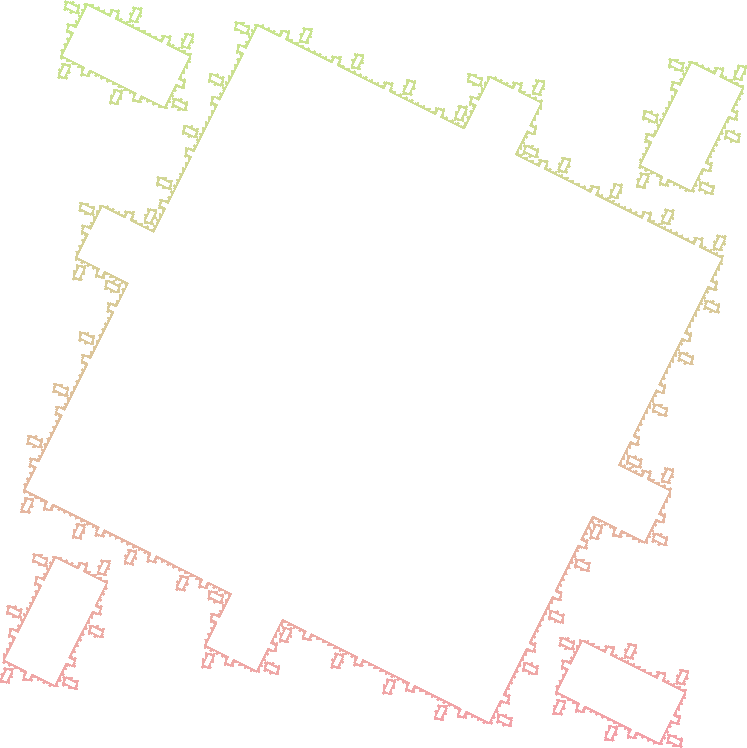
Quadratic Koch Island
Axiom : F+F+F+F
Rules :
 - F -> F+F-F-FF+F+F-F
Angle : 90
Quadratic Koch Island 2
Axiom : F+F+F+F
Rules :
 - F -> F+FF-FF-F-F+F+FF-F-F+F+FF+FF-F
Angle : 90
Islands
Axiom : F+F+F+F
Rules :
 - F -> F-SFF+F+FF+F-S-FFF-F+F+F-FFFF
 - S -> SSSSSSSS
Angle : 90
Islands 2
Axiom : F+F+F+F
Rules :
 - F -> F-SF+FF+F+FF-S-FF+SF-FF-F-FF+S+FFF
 - S -> SSSSSS
Angle : 90

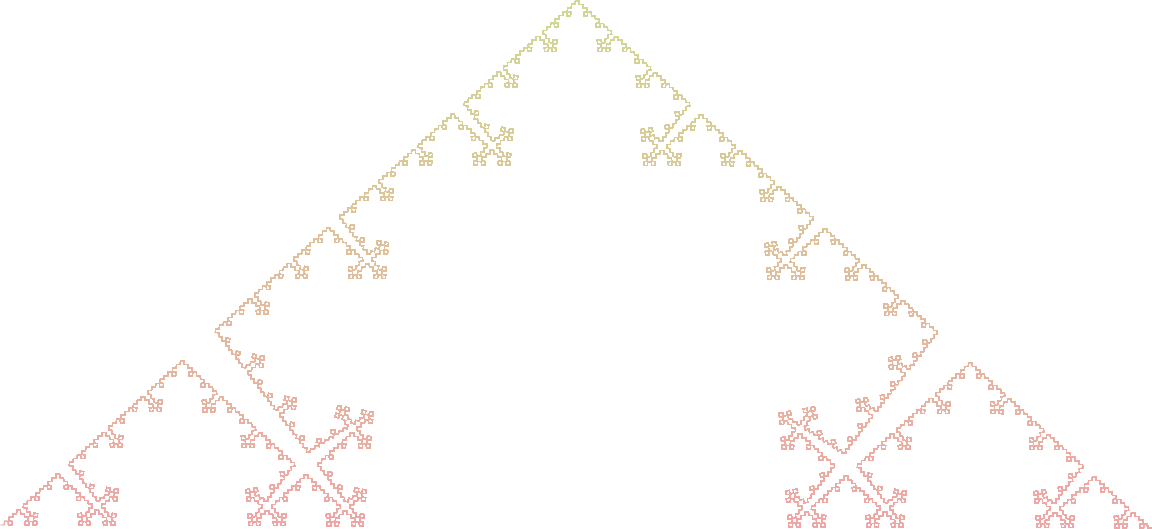
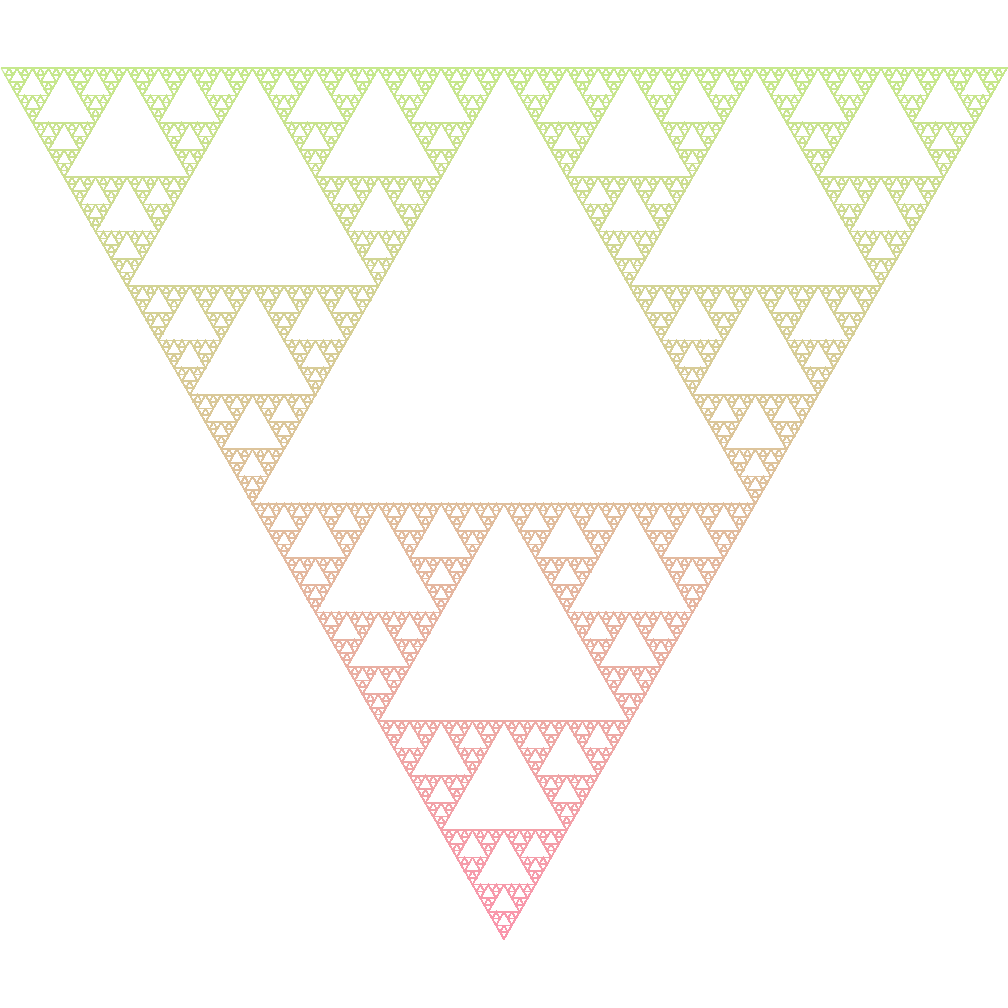
Sierpinski Triangle
Axiom : FXF--FF--FF
Rules :
 - F -> FF
 - X -> --FXF++FXF++FXF--
Angle : 60
Sierpinski Square
Axiom : F+F+F+F
Rules :
 - F -> FF+F+F+F+FF
Angle : 90

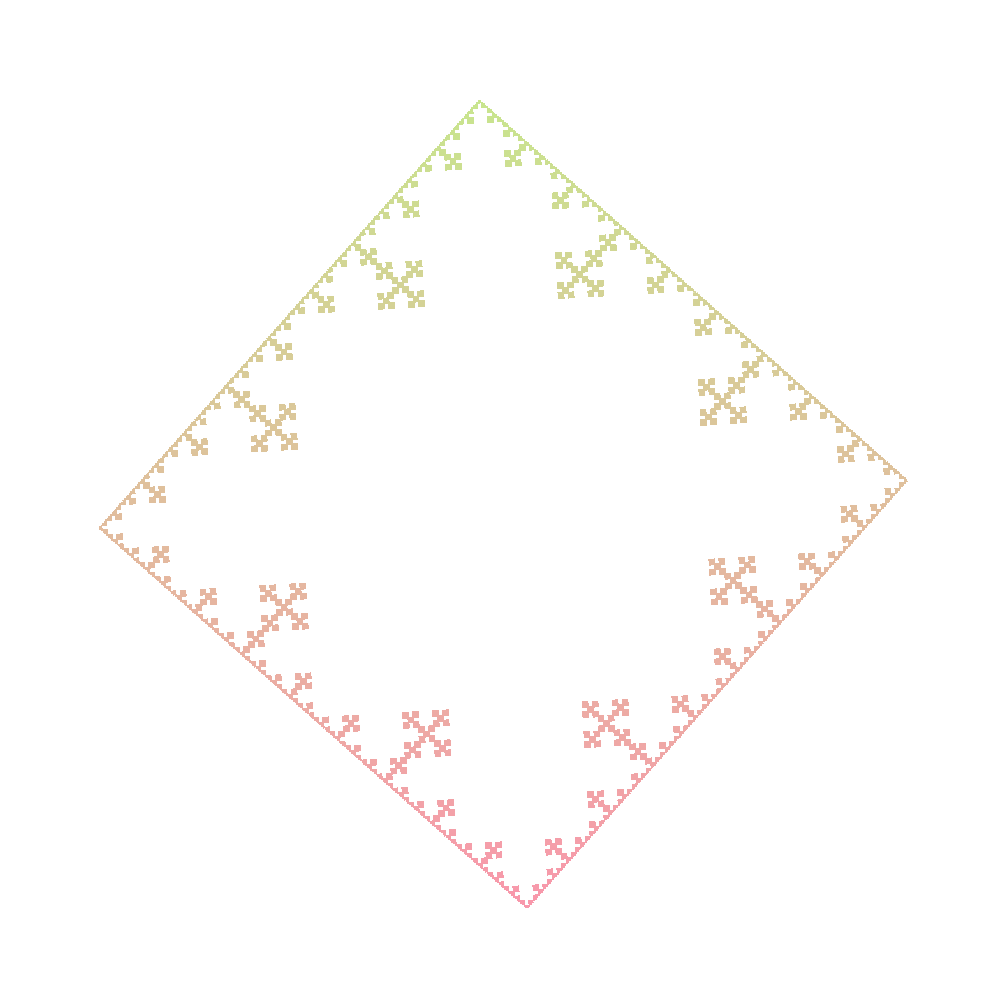
Hilbert Curve
Axiom : X
Rules :
 - X -> +YF-XFX-FY+
 - Y -> -XF+YFY+FX-
Angle : 90
Frec Fractal
Axiom : XYXYXYX+XYXYXYX+XYXYXYX+XYXYXYX
Rules :
 - F ->
 - X -> FX+FX+FXFY-FY-
 - Y -> +FX+FXFY-FY-FY
Angle : 90
